Friday, February 6, 2015

Pivoting Seat vs. Stationary Seat vs. No Seat


Pivoting Seat vs. Stationary Seat vs. No Seat

PIVOTING SEAT
We think that one of the best features of our 4-Leg Spider is the combination of our Pivoting Seat mounted on the Swivel Seat Mechanism. The Swivel Seat Mechanism pivots 360 degrees around the column, while the Pivoting Seat allows the camera operator to move in and out relative to the column. Putting these two motions together gives the camera operator the ability to leave his eye tucked into the camera’s eyepiece as his body moves effortlessly in concert with the panning motion of the fluid head. This in turn gives him the opportunity to concentrate on his framing and, if needed, incorporate a zoom or focus pull with his left hand as his right hand pans and tilts the fluid head.
Let’s consider the following shot requirement: As the dolly is tracking to the left, our actor is walking in the opposite direction passing by the dolly as it continues to track. The actor stops and turns to look over his right shoulder towards the camera, which tilts up and zooms in on his face as the dolly comes to a quick stop.
Swivel Seat Demo 1
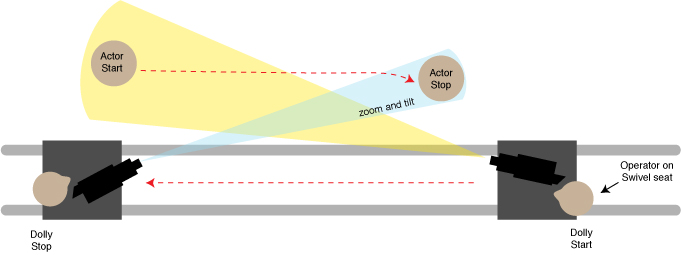
As we said, with our Pivoting Seat on the Swivel Seat Mechanism, the camera operator will be able to keep his eye to the eyepiece easily following this action as the camera pans about 150 degrees during the shot.
STATIONARY SEAT
Now consider this shot if on a stationary seat like those found on some three wheel dolly systems.
Swivel Seat Demo 2
The seat does not pivot and is positioned over a wheel to prevent tipping. Obviously one could start the shot the same way, but as the camera pans to the right, the eye has will have to come away from the eyepiece, so a monitor will be needed for viewing, but it cannot be a flip screen, because you will not be able to see it as the camera pans to the right. If an on-board monitor is added to the top, you will be able to see a bit better, but only if you can counter-pan it during the shot. However, the biggest problem is that the pan bar coming from your right and moving left to accommodate the 150 degree pan will cause you to lean completely out of the seat. In other words, you cannot really do this shot with this dolly configuration.
NO SEAT
One cannot effectively stand on a 3-leg system because the dolly will tip if one's weight is not directly over a wheel. Therefore one must walk next to the dolly as it tracks. The main problem with the walking 3-Leg system (ours included) is that camera moves cannot be too complex. In the above example, one could do the tracking of the dolly, and the panning of the camera, but controlling a zoom and focus pull would be quite difficult. When walking a 3-Leg system, since the camera is generally pointing somewhat perpendicular to the track, the operator has to walk sideways in a rather clumsy step-over-step fashion. And since he is outside of the track, it is difficult for him to reach the zoom and focus controls of the lens, although this could be helped by adding a remote zoom and focus controller to the panbar. Next let's consider standing on a larger dolly, like a traditional doorway dolly without a pivoting seat. Now you have plenty of room to move around the tripod mounted on the dolly, so there is no tipping issue or leaning out of the seat issue. With this system one should be able to do the shot described above, but with two disadvantages. 1) You must use a much larger dolly, so you lose the portability of a smaller dolly, and 2) coming into a quick stop feels very different when one is standing rather than seated. A quick stop while standing will cause your upper body to lurch considerably, whereas when seated you do not experience this. We have had many owners of traditional doorway dollies buy our Adjustable column and Seat Assembly to add to their dolly to make them more effective than working with a tripod on the dolly.
So please remember, all seats are not alike, and complex moves are difficult if not impossible to make while walking a dolly.

Wednesday, January 20, 2010

Vector Bar Balancing

One of the hardest things to do when operating a jib is to come into a clean stop without a little bounce at the end of the move. One reason for this is that the jib itself wants to seek its original balance point, and you have to apply pressure to keep it from moving. Our Vector Balancing System eliminates this problem inherent in all lightweight jib arms. For example, if the arm is balanced horizontally, and the shot ends with the camera near the ground, the operator must apply force to keep the arm from rising back up to its original position. The Vector Balancing System removes the inertia from the jib and transforms it into a zero-drift system, ensuring that the arm will always stay perfectly balanced regardless of its stopping point. Now the operator can more easily make clean stops.

The Vector Balancing System now comes as standard equipment on the Standard Porta-Jib and the Porta-Jib Traveller.

How to use the Vector™ Balancing System

Support the front of the jib with its case standing on end (or some other support), and load the fluid head and camera onto the front. Make sure that the boom drag (and of course the boom lock on the Standard Jib) are not applying any tension. Begin adding weights to the back horizontal weight bars until you feel the jib beginning to lift off the case that was supporting the front weight. Fine tune the balance by sliding the tuning weight back and forth on the steel bar until you have balanced the jib arm parallel to the ground. Note: at this point you have not yet put any weight on the vertical Vector Bar.

Tilt the jib up to a 45 degree angle and let go. You will see the jib immediately start sinking as it seeks its original balance point. This is the problem we want to eliminate with the Vector Bar: that when you want the jib to stop, it will stop when you finish the move and not want to continue moving.

Remove one of the two threaded nuts from the Vector bar and transfer some of the weight from the horizontal bars to the Vector Bar (usually no more than a third of the total weight). Transferring the weight from the horizontal bars to the Vector bar does not affect the balance because the center of gravity of the weight has not changed on the horizontal axis. At this point you have only guessed at the amount of weight to transfer to the Vector Bar. To see the effect of this change, boom the jib up to approximately a 45 degree angle and let go. The jib should no longer want to seek its original balance point, but until we fine tune the amount and placement of the weight it will still move. (What has happened is that as the jib tilts upward the CG of the Vector Bar weight has moved back relative to the CG of the weights on the two horizontal weight bars. It is as if you moved the tuning weight back.) If the arm still wants to move downward, then we either need to transfer more weight to the Vector Bar, or we simply need to position the weight higher on the bar. The higher it is the more the CG will displace to the rear as the jib tilts. If, on the other hand, when we let go, the jib wants to pull further upward, then this means we have too much weight on the Vector Bar. You need to either lower the weight on the bar, or remove some of the weight and put it back onto one of the horizontal bars.

Since the weight is sitting on a threaded nut, it is easy to lower the weight on the bar by just spinning the weight clockwise, which will cause the nut to rotate and lower the weight down the shaft. However, to make the weight go higher on the bar, it is better to lift the weight with one hand and turn the nut with the other hand, If you try spinning the weight counter-clockwise to raise the weights, you may inadvertently cause the Vector Bar itself to rotate and begin to unthread from its connection to the steel weight bar.

Fine tuning the fine tuning. When the Vector Bar is adjusted properly, the jib should come to stop anywhere in the boom range when you let go of it. If it wants to creep a little, simply add a little drag with the boom drag knob. You don't want to spend all day fine tuning this balance. Once you have done this, and if you tend to use the same camera system, then the next time will go quickly since you will know how much over-all weight to use, and how much to place on the Vector Bar.

If you find that the jib stops nicely whenever you let go when tilting upward, but that it creeps quite a bit when you have tilted downward, it usually means that the jib itself is not level, so make that adjustment. This is where our new 3-Way Leveler comes in handy because you can easily adjust the level of the fully loaded jib without adjusting the tripod legs.

Owners of older Porta-Jibs, those made prior to the introduction of the Vector Bar System, can get contact Porta-Jib directly to purchase an upgrade kit for $100.


Friday, December 11, 2009

How to balance a fluid head


How to balance a fluid head
Just as it is obviously important to balance a jib arm, it is equally important to balance one's fluid head, especially if you are putting it on a jib arm. Unfortunately, I have found over the years that it is not uncommon for people not to know how to balance their fluid heads. When they are only working on a tripod, they can get by with it not being properly set-up, but when it's on a jib, an improperly set-up fluid head can inhibit the jib's movement considerably. You will find yourself booming the jib when all you wanted to do was tilt the camera. So if you are having trouble hitting your marks with the jib, before you blame the jib, or yourself, have a look at your fluid head.
I worked in a camera rental facility for many years and it was common to watch camera assistants simply muscle the head around a bit, dial in some fluid drag that felt appropriate, and think, "Yeh, that's good." They did not do any balancing at all, and that really is not the correct way to do it.
Almost all fluid heads have locks for the pan and tilt, fluid drag adjustment for pan and tilt, and usually an adjustment for the spring tension on the tilt. The better heads have a continuously adjustable spring adjustment which is ideal for accurately dialing in the balance. Others have a lever (or levers) to either engage or disengage a spring (or springs). Unfortunately, the really low-end heads often do not offer a spring adjustment. For those of you who have an adjustable spring, here is what I recommend:
1) Put the camera on the head and lock the tilt axis.
2) Set the fluid drag setting to zero, so that when you unlock it, you will only have the spring affecting the tilt.
3) Unlock the tilt axis and balance the camera fore and aft on its sliding balance plate. We haven't adjusted the spring yet, so it will probably want to fall either backward or forward, but it should have the same response in either direction. In other words it should be centered so that it is neither front nor back heavy. You can fine tune the fore/aft position once the spring is set properly.
4) Now set the spring tension. Heads like those made by O'Connor or Cartoni generally have continuously adjustable springs so you can dial in the tension accurately. Others like Sachtler have preset spring choices that allow you to either engage or disengage various springs and these will get you very close. Either way, you now want to set the spring. To do this, tilt the camera forward about 45 degrees to see what it does as you begin to let go of the panbar. If the camera wants to continue falling downward, then you need more spring tension. If it pulls upward when you let go, then you need less spring tension. Dial in, or manipulate the on-off levers, to find the right tension.
5) If the camera is balanced fore and aft properly, and the spring tension is set properly, the camera should always stop exactly where you point it as you let go of the pan bar.
6) Now dial in the desired amount of fluid resistance for the tilt and the pan.
7) And this brings me back to my original point--that is, for a jib arm, this will be using very minimal fluid drag. You want a floating feel to the movement of the head just like the floating feel of the jib arm itself. As I said above, you do not want the jib to boom when all you want to do is tilt the camera, which is what will happen if the drag is too strong. On a tripod, you may prefer more resistance, but on a jib you want a light, floating feel.

Please take the extra few minutes to properly balance both the head and the jib. It will make your work much more satisfying. For those of you unfamiliar with our Vector Balancing System, please read those instructions as well.

Thursday, December 10, 2009

Front vs. Rear Operated Jibs

A few notes for those of you new to the world of jib arms, and who may be confused about the difference between front-operated and rear-operated systems.

People tend to use the words “crane arm” and “jib arm” interchangeably these days. Originally, a crane was a much larger unit, usually carrying a camera operator and assistant as well as the camera. A jib was a smaller unit carrying just the camera. However, the important distinction these days is not whether you call it a crane or a jib, but rather whether you operate it from the front or from the rear, because even though these systems look very similar, they are not really the same tool. Porta-Jibs are primarily used as front-operated devices, (although our Standard Jib can be rear-operated as well--more on that later).

Let’s start with understanding the basics of a rear-operated system. Rear-operated units need to have a way to remotely pan and tilt the camera. Be aware that some of the inexpensive ones do not even pan the camera, they only tilt via a cable, and panning can only occur by panning the entire arm rather than the camera head itself, which means you cannot do a very sophisticated compound move. However, more typically, rear-operated systems will be more complex than that, and will have a pan and tilt head that either is driven by motors or by a cable system, so that you have the ability to pan and tilt the camera as well as boom and pan the jib itself. The advantage of these systems is that they can position the camera far higher than one could hope to reach if manually operating the jib from the front and also be able to reach out over things.

So the question becomes: why would one want to operate from the front, when the rear operation gives one so much more range of motion. This is where it becomes a question of the using the right tool for the right job. If what you want is extreme height and reach, then obviously you want a large jib with a remote head controlled from the rear. If however, you want to make more subtle movements in the 2-to-8 foot range, then a front-operated jib is the way to go.

In this case, you simply place a fluid head (that you typically already own) onto the front of the jib. You already have good intuitions of how to pan and tilt the head, since you probably have been doing this for years on your tripod. So when you need to follow a complex action on a jib, which do you suppose is easier to master--front-operation with a fluid head or rear-operation with joysticks? Let's suppose you are following an actor who suddenly stands up and moves across the set, and your job is to keep him framed in the center of the camera's view. Imagine trying to make a quick speed change, a pan-tilt motion, and a boom up while operating from the rear with joy-stick controls. Then imagine trying it with a front-operated jib, where the speed change and framing come easily because you are comfortable doing that with your fluid head. So all you are adding to the mix is the booming motion. It should be obvious which will be easier to master. Furthermore, the lower the shot the more difficult it becomes for the rear operator because now his hands need to be well above his head as he is trying to get the camera to low position. True it can be done from the rear by experienced operators who make a living at being remote head operators, but a new client will often be reduced to using his jib only for very easily controlled high angle moves.

So if height is what you need, then the remote head is for you. But if what you wants is to add movement to your everyday work where the camera tends to stay in the low to mid-height range, then clearly a front-operated jib is the way to go. No additional batteries for motors are needed, a far quicker set-up time is obtained, and generally a much lower cost, because low-end remote heads start at around $2000 to $3000, just for the head without the arm. When you think of which type of shot is far more prevalent in everyday production -- a floating movement in the less than 8 foot range, or the birds-eye view of scene – obviously, for most clients, the front-operated jib is the more useful tool.

The Porta-Jib is primarily a front-operated type. However, having said that, we need to point out that although we do not make a remote head for jibs, our Standard Jib does have the capability of adding an additional 3 foot extension to lengthen the front arm, so often customers will choose this version to use with another manufacturer’s remote head. That way they will have the capability of working either from the front or the rear as the job’s requirements dictate.


The Standard Porta-Jib as a rear operated jib arm

Wednesday, December 9, 2009

About this blog

Occasionally people ask about things that I think are obvious about our products at Porta-Jib, but, as it turns out, clearly are not. And after explaining something to them, they often say, "Oh, now I get it." My conclusion is that I need to work on communicating some of these points better, and therefore, I thought a blog might be a good way to augment what is on the website.

For example, it seems that people don't understand why we added, what we call, the "Vector Balancing Bar" to our jibs, or why we think our Seat Assembly for the 4-Leg Spider Dolly is truly unique in the world of lightweight dollies, or why one would invest in an underslung head as opposed to a traditional fluid head, or why it is critical to adjust the settings on the fluid head completely different when on a jib arm as compared to when it's on a tripod, and things like this. So when I feel inspired, I will try to jot down some of these notions, and hopefully they may prove to be helpful.

Thanks,
Mark